Brick Repointing: All You Need to Know
- Published on September 17, 2018
- Revised on February 14, 2023
- 7 min read
Jason Pagliuca
Verification Coordinator | RenoAssistance
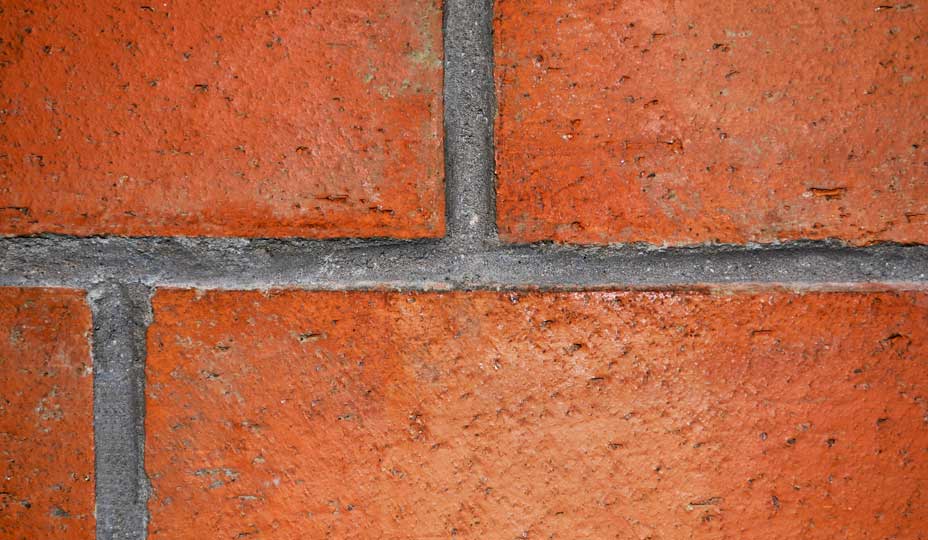
When joints on a brick or stone wall begin to deteriorate, it’s time to get them repaired – ASAP! Yes, deteriorated joints make your home or building look neglected, but that’s not what the rush is all about. Deteriorating joints can prematurely age your wall’s integrity, which might make it collapse. Simply fixing the surface of the joints isn’t enough. The building might look as good as new, but – as mentioned – its integrity is at risk. Ensuring your masonry is in top shape will avoid you some major headaches. Here, we’ve broken down all you need to know regarding brick or stone repointing to ensure your home looks great, but also stand the test of time!
If the mortar joints around the bricks or stones are starting to show signs of wear and tear (crumbling, cracking, etc.), you’re better off repairing them as soon as possible as any damages done to the joints will only worsen over time. Even more so as water infiltrates through the mortar or behind the wall. Any water that gets through will most likely be subject to multiple freeze-thaw cycles, which will, in turn, create the same phenomenon that causes potholes on the road and result in bowing (bulging) brick. When this happens, portions of the wall can start to detach from the rest of the structure and even put people’s safety at risk. Putting off repairs will only worsen the situation and increase repair costs as time passes.
Brick repointing consists in removing a portion of the deteriorated mortar and redoing the joints with new mortar. Repointing halts any further water infiltration through the mortar and behind the brick wall – which avoids any mortar crumbling or bulging brick and saves the wall (or any part of it) from collapsing. Once repointing is done, the wall looks as good as new and is officially protected from any mishaps Mother Nature might have in store.
You can repair mortar joints yourself if you like. Though, you should be fully aware of what you’re getting yourself into! You’ll most likely need scaffolding, a ton of equipment (an electric grinder, a hammer and chisel, a stiff brush, a trowel, a brick jointer, an electric drill with a mixer, a bin for your mortar, etc.), quality mortar mix, some knowledge on how to complete the job, and a lot of patience!
If there are multiple sections where your mortar has started to deteriorate, you’ll need to remove it and replace it with new mortar. This means you’ll need to put multiple days aside just to fix a single side of the building.
NOTE: If the entirety of the brick wall has had a waterproofing solution applied to it, it might be difficult to get the mortar to adhere to the surface. Should you be in this situation and/or do not want to undertake this renovation project, we can refer you up to 3 qualified masonry contractors that will bid for the opportunity to do the masonry work you need to get done.
The bricks or stones that will be getting worked on need to be warmer than 5°C and cooler than 25°C, 24h before and after applying the mortar. Of course, it is possible to get the work done in temperatures lower than 5°, but it requires you to protect the surface with a protective cloth and install heating at the foot of the section you are working on to maintain proper temperature. As you can see, this solution is less than ideal as it requires more complex preparations. In any case, you should avoid repointing if rainfall is in the forecast.
Repointing brick can cost you anywhere between $14 and $22 per square foot. According to quotes our customers have received from masonry contractors, the cost of repointing one wall on a duplex costs roughly $12,240 (for a 34’x20′ wall at $18/sq.ft.), whereas the cost of repointing a wall on a commercial building can be significantly higher. It all depends on the material cost, quality, and wall size.
For a more detailed breakdown of costs regarding getting masonry work done, take a look at our Cost of Masonry Work article.
We often see representatives going door-to-door offering to provide their masonry repair services to homeowners whose homes have deteriorating mortar joints. However, in most cases, these companies will only do repairs at the surface – which will only last 2 to 3 years.
If your home or building is in a historic part of town, you’ll want to preserve the architectural heritage of the building. You want to keep it unique and increase its resale value, but still keep its original structure in place. Some masonry companies are specialized in heritage home restoration.
When working on these projects, masons tend to have to work with other professionals – most often with architects and engineers. We’ll gladly help you put together a team of professionals for a successful heritage restoration.
For repairs that will last the test of time, a great deal of mortar will need to be removed. All depending on the condition your wall is in, it might be better to remove each brick, clean them up, and reinstall them. In either case, you’ll be giving a second life to your brick or stone wall.
If you know people that have gotten their masonry repointed or any other masonry work done, you can surely ask them to refer you to the contractors they worked with. Regardless of whether your friends, colleagues or family members speak highly of them, we still suggest you ask them any question you may have, as well as do a thorough verification of their business before hiring them.
We’ll gladly refer you to Verified Contractors if ever you don’t feel like going through an auditing process. We’ve already audited hundreds of contractors. We can refer up to 3 masonry contractors that have our seal of approval. They’ll compete against one another so that you can make an informed decision and pick the best contractor in terms of price, quality of work, and competence.
Replacing House Siding: Warning Signs You Can’t Ignore
The Complete Guide to Masonry: Stone and Brickwork
Exterior Cladding Guide: Common Types, Tips, and Costs
Going Green: 5 Eco-friendly Siding Options to Consider
Cost of Home Adaptations for Reduced Mobility
How much does an HVAC system cost in 2024?
A Retrofitting Boost: Supporting your Renovation with the Canada Greener Homes Grant
2024 Home Addition Costs | Montreal vs Toronto
Cost Of A Home Renovation in 2024 | Montreal vs Toronto
Sunroom Addition Cost in 2024 | Toronto & Montreal


